Configure Single-Sign On (SSO) with CyberArk
This article describes how to configure Single-Sign On (SSO) between NetVendor Maintenance and CyberArk Workforce Identity
This article is intended for systems administrators at our client companies. In order to follow these instructions, you will require access to your CyberArk Identity Administration Portal.
In order to configure SSO between NetVendor Maintenance (NVM) and CyberArk, some configuration will need to be completed in the CyberArk Identity Administration Portal by your team, and then some configuration will need to be completed by the NVM Support Team.
Step 1: Create a New "Custom" Web App in CyberArk Identity Administration
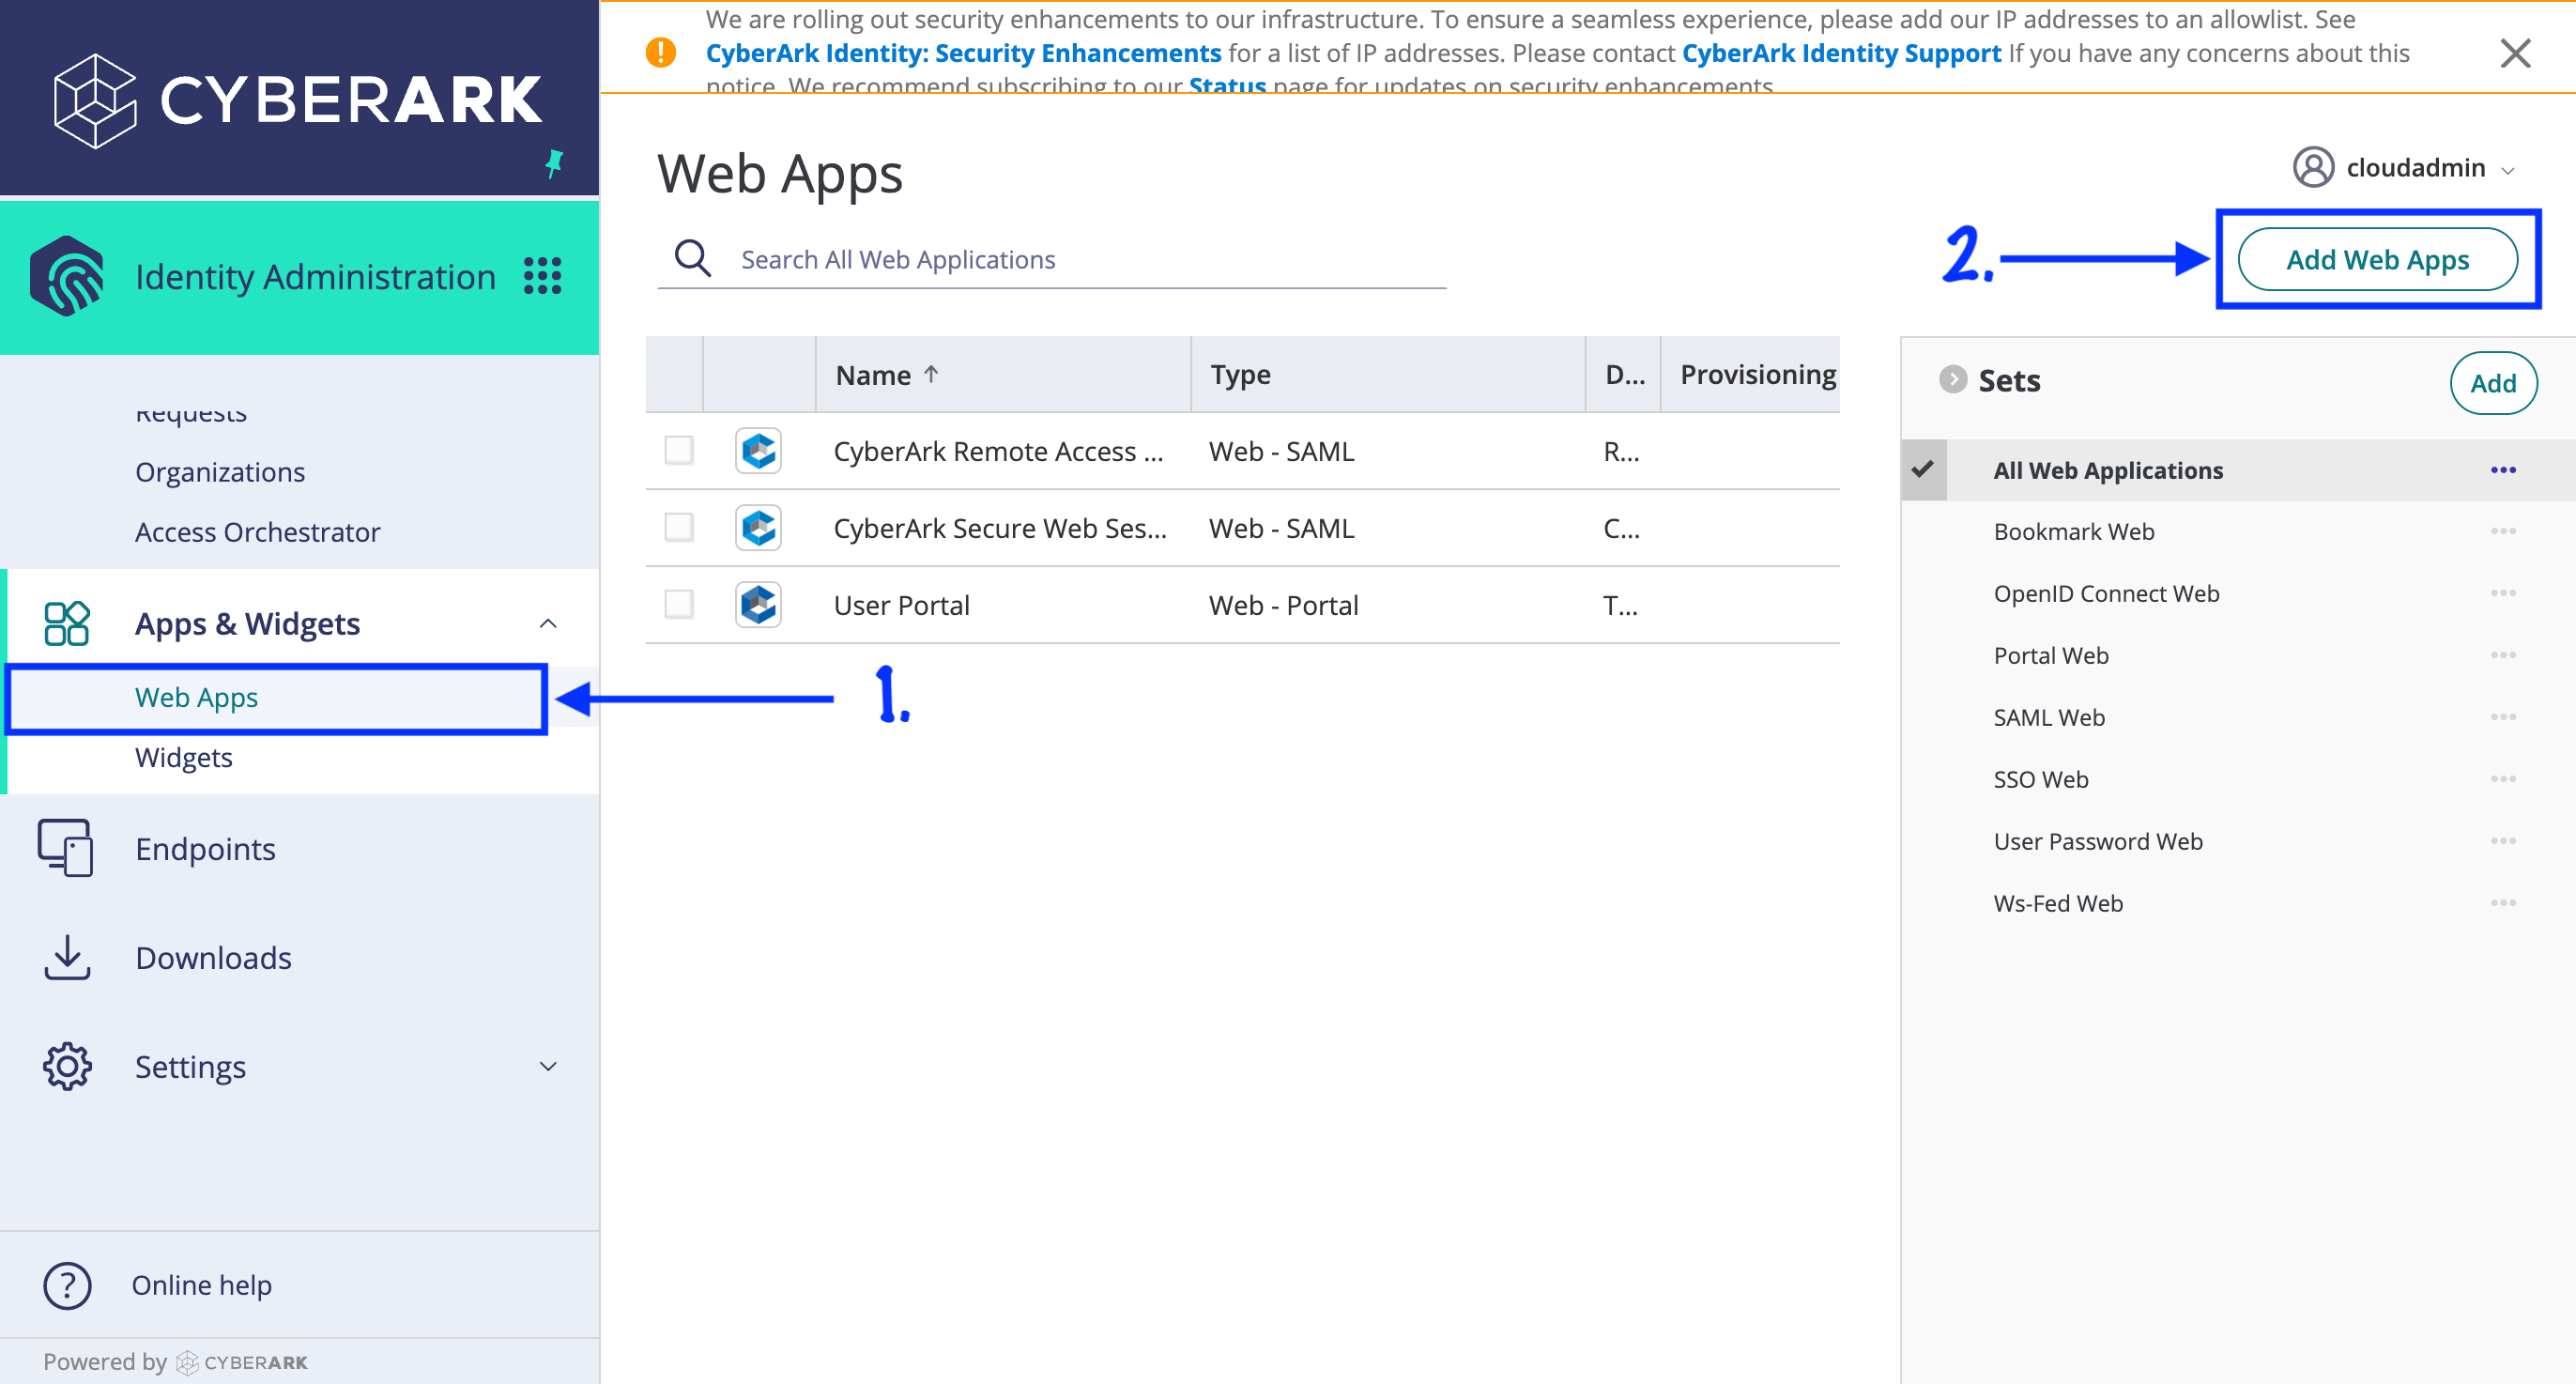
- Navigate to Apps & Widgets > Web Apps in the sidebar navigation.
- Click "Add Web Apps".
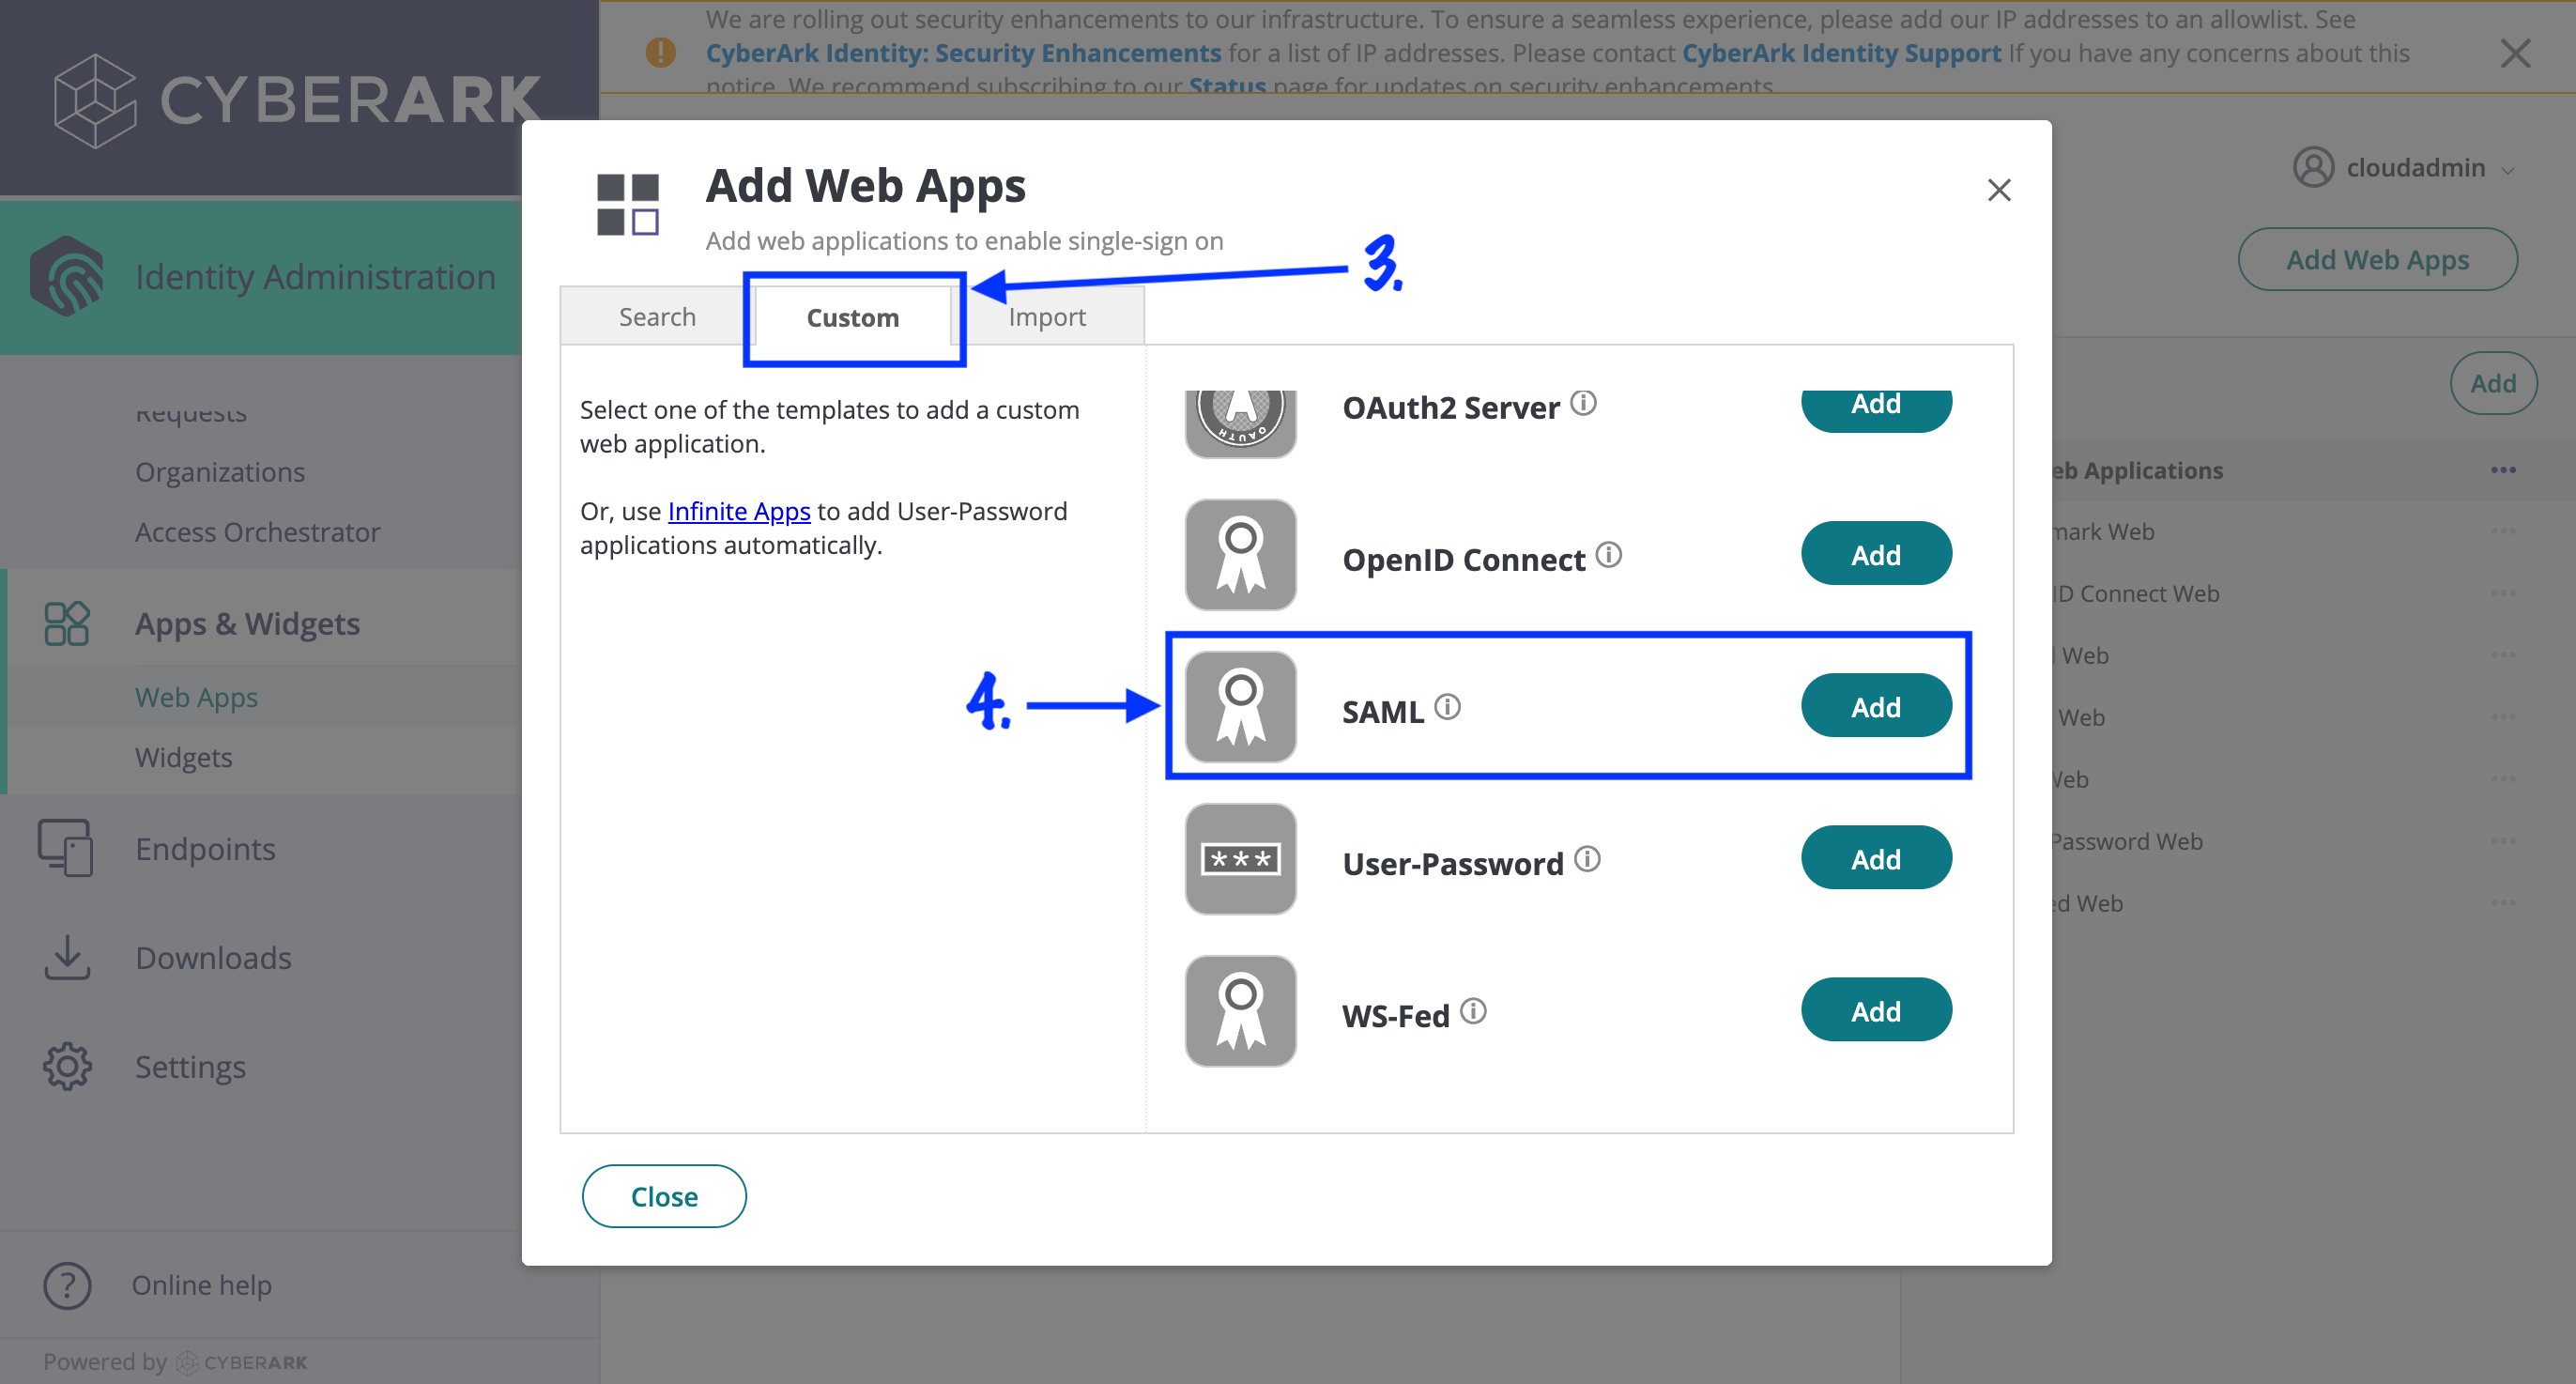
- Choose the "Custom" tab.
- Click "Add" on the "SAML" template.
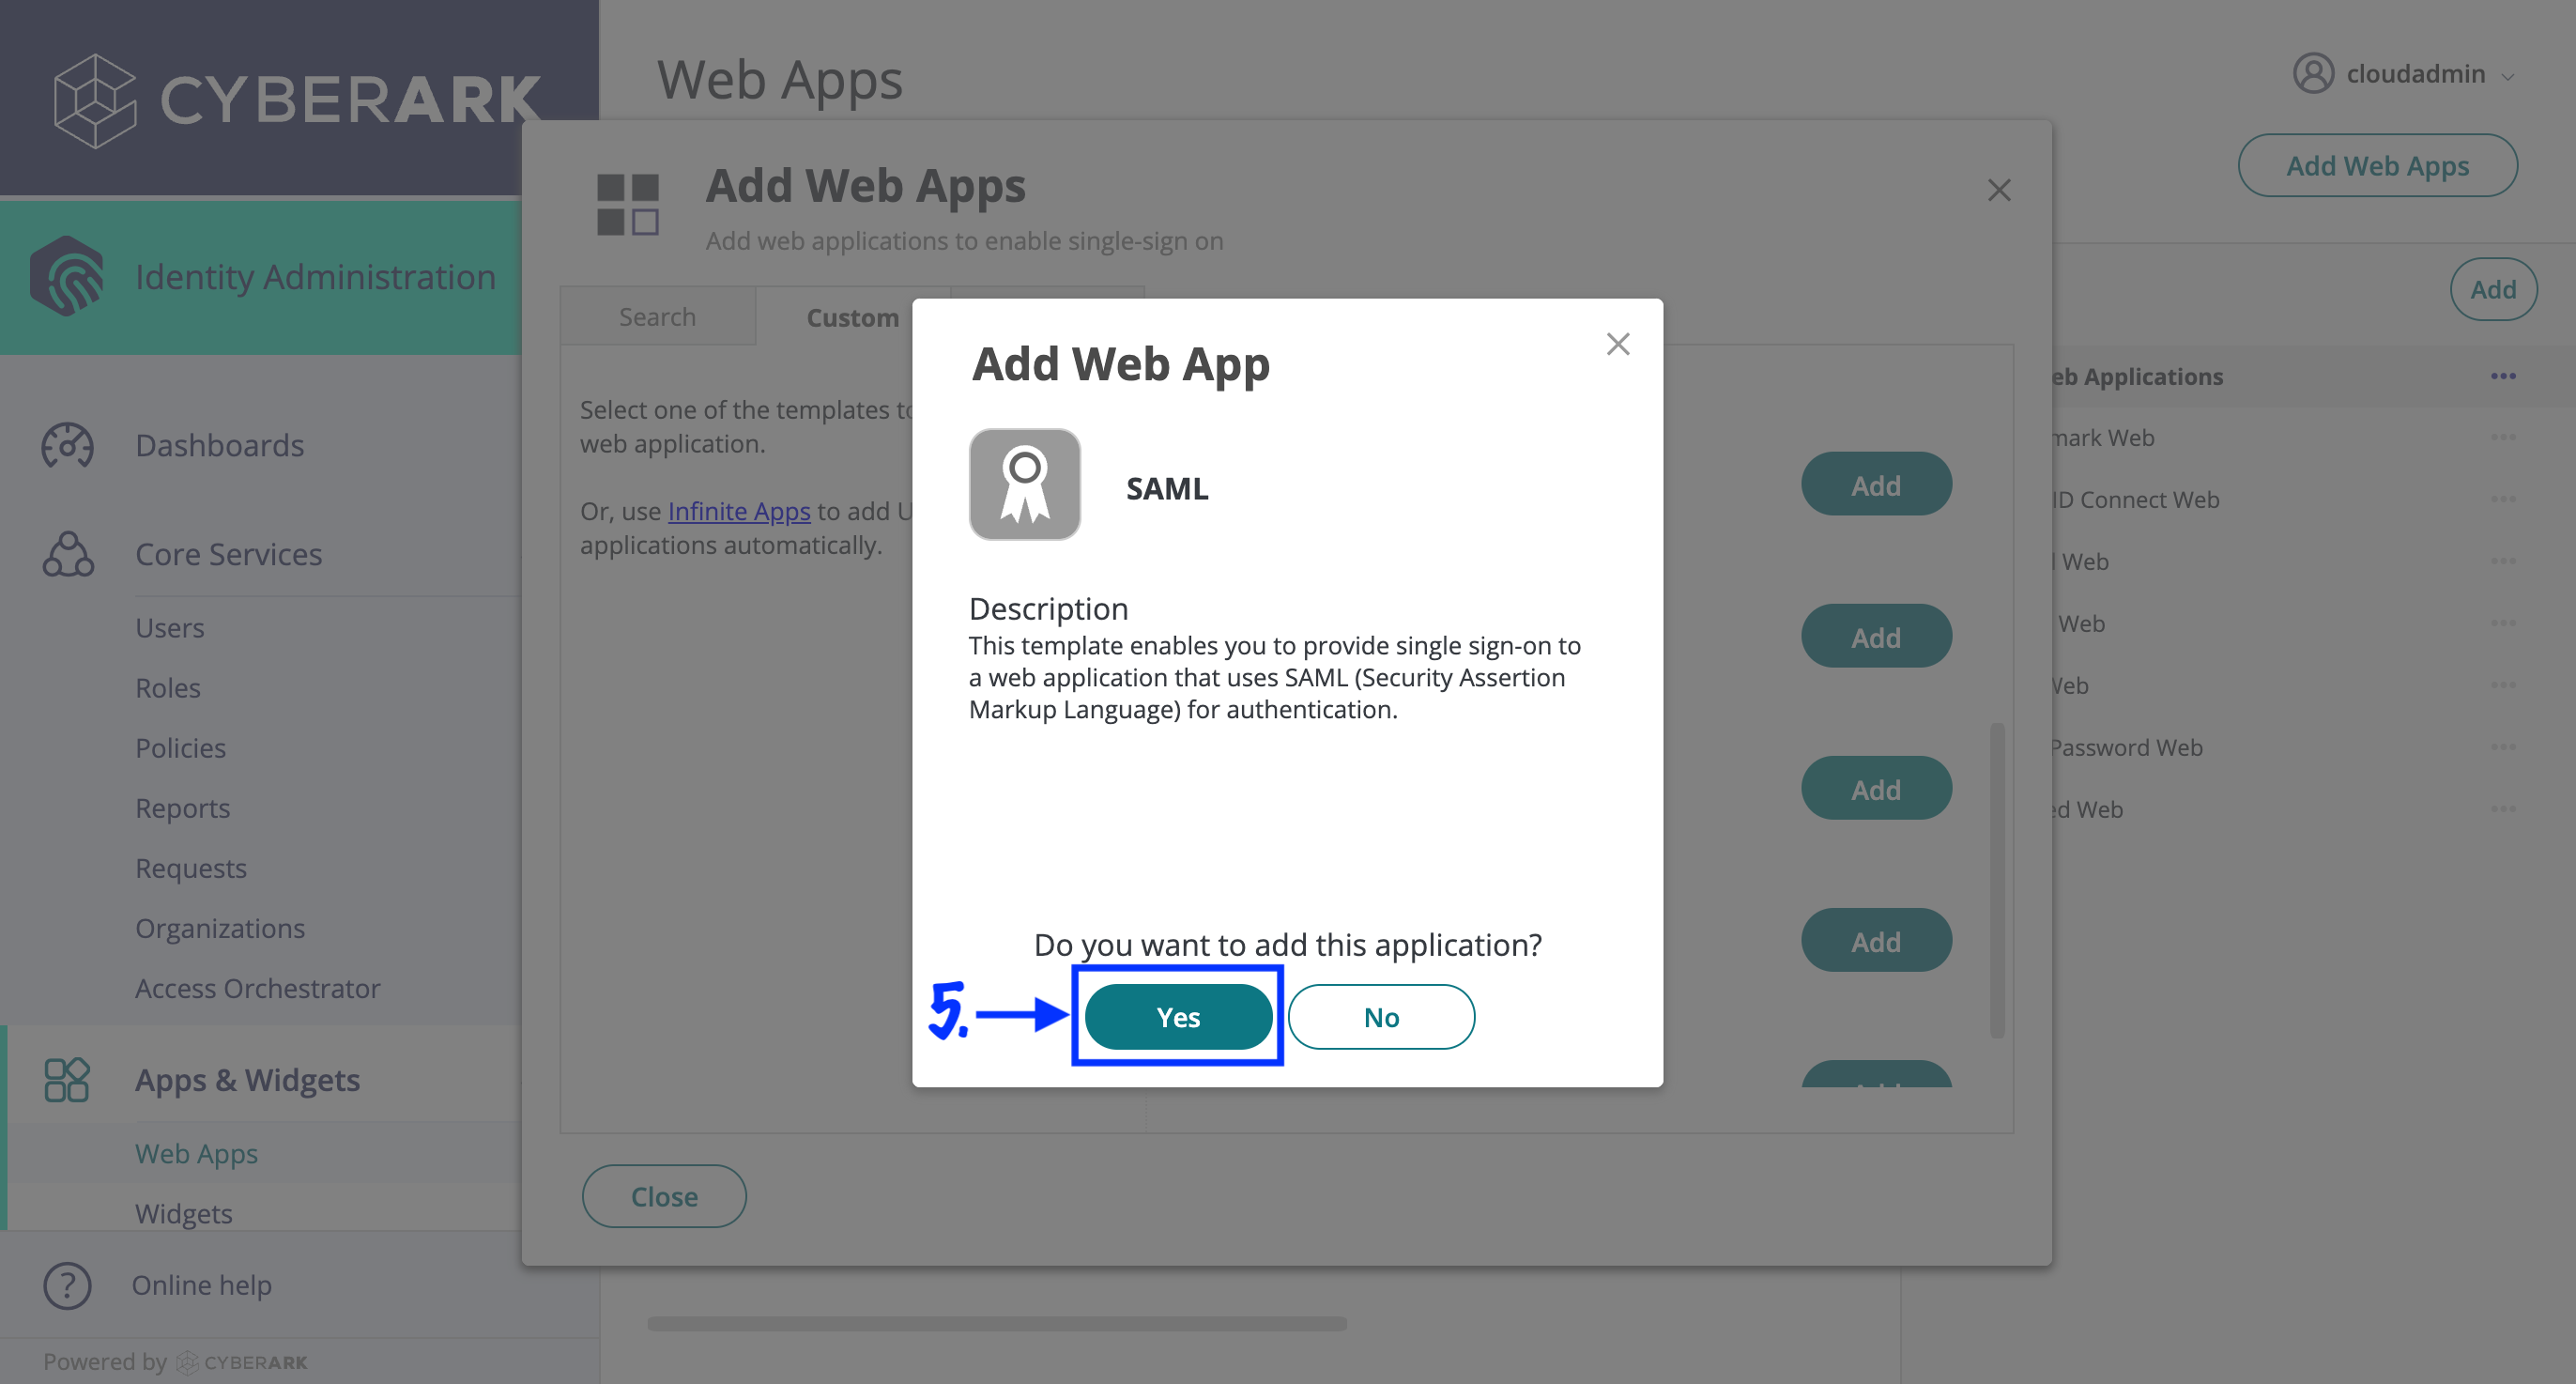
- Confirm that you want to add this application by clicking "Yes".
Step 2: Configure the CyberArk Web App
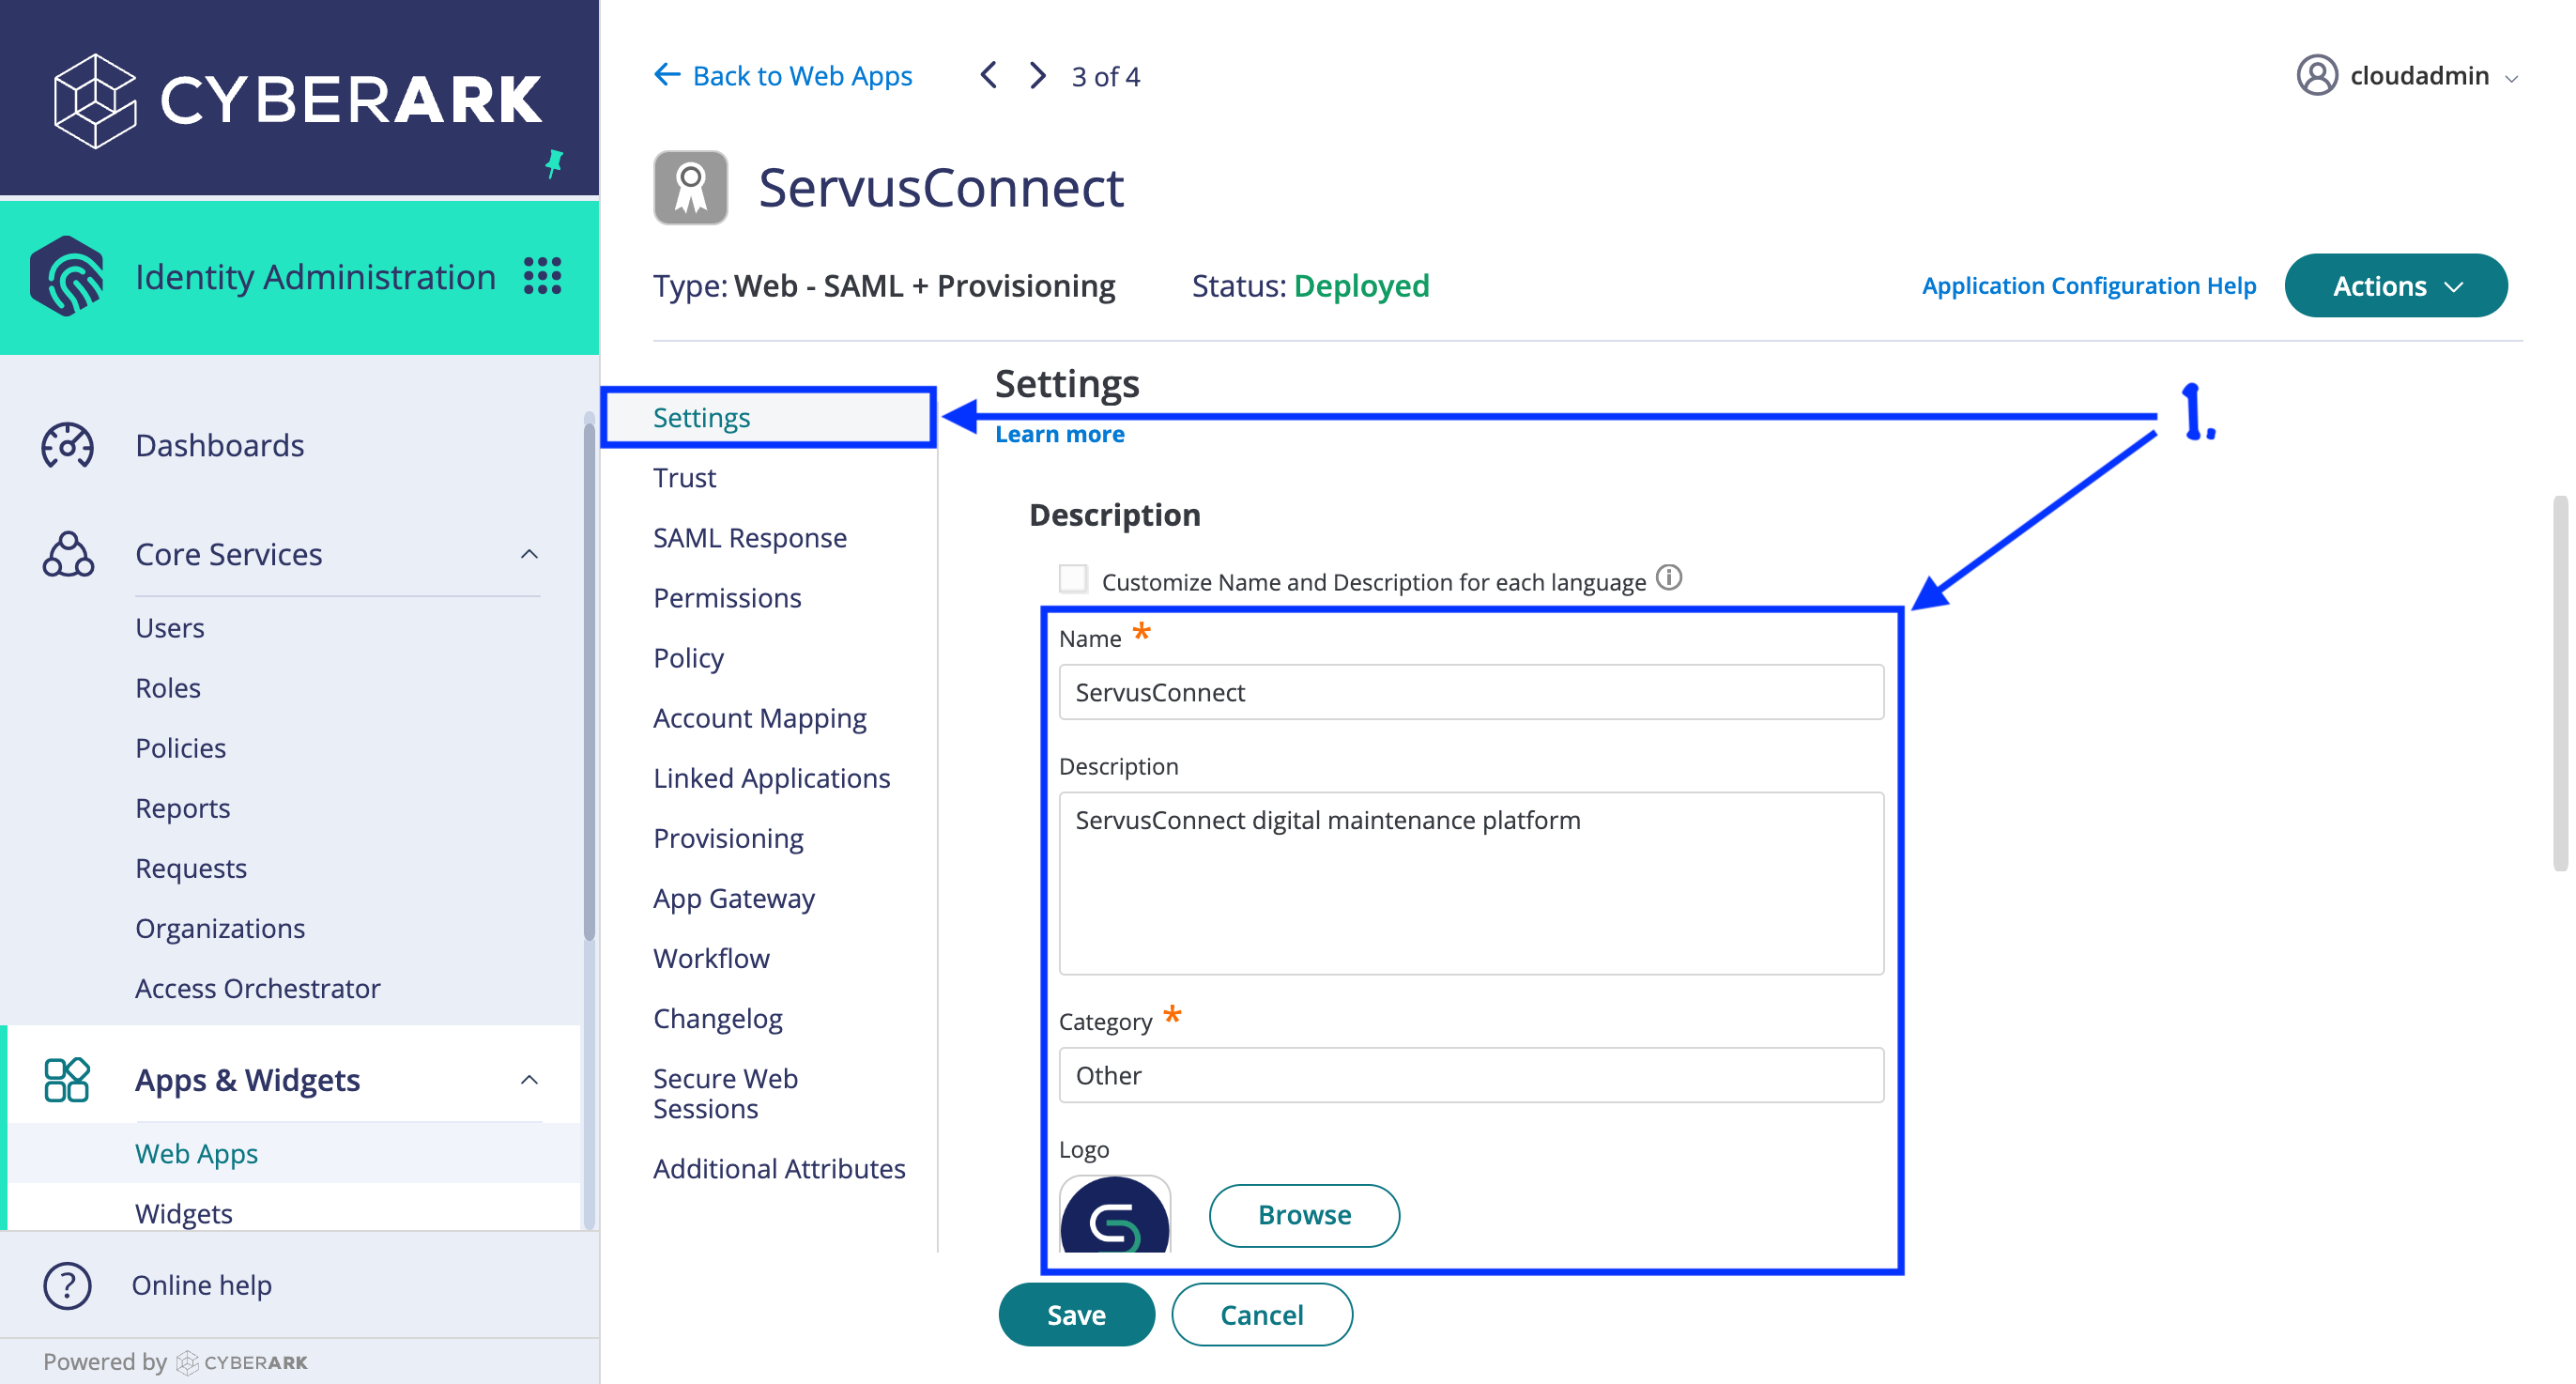
- On the "Settings" tab for the new app, name the app "NetVendor" (instead of "SAML") and provide any Description, Category, and Logo you like. (You may download an appropriate logo from here.)
- At the bottom of the "Settings" tab, underneath "Advanced", turn OFF "Show in user app list". This must be off because the NetVendor Maintenance SAML connection cannot support IdP-initiated authentication - if the SAML connection is not started on the NetVendor Maintenance side, we cannot validate that we have solicited the SAML response received.
- Instead, in a later step, we will guide you through creating a CyberArk "Bookmark" so that your users will still see a "NetVendor" icon on their CyberArk app launcher.
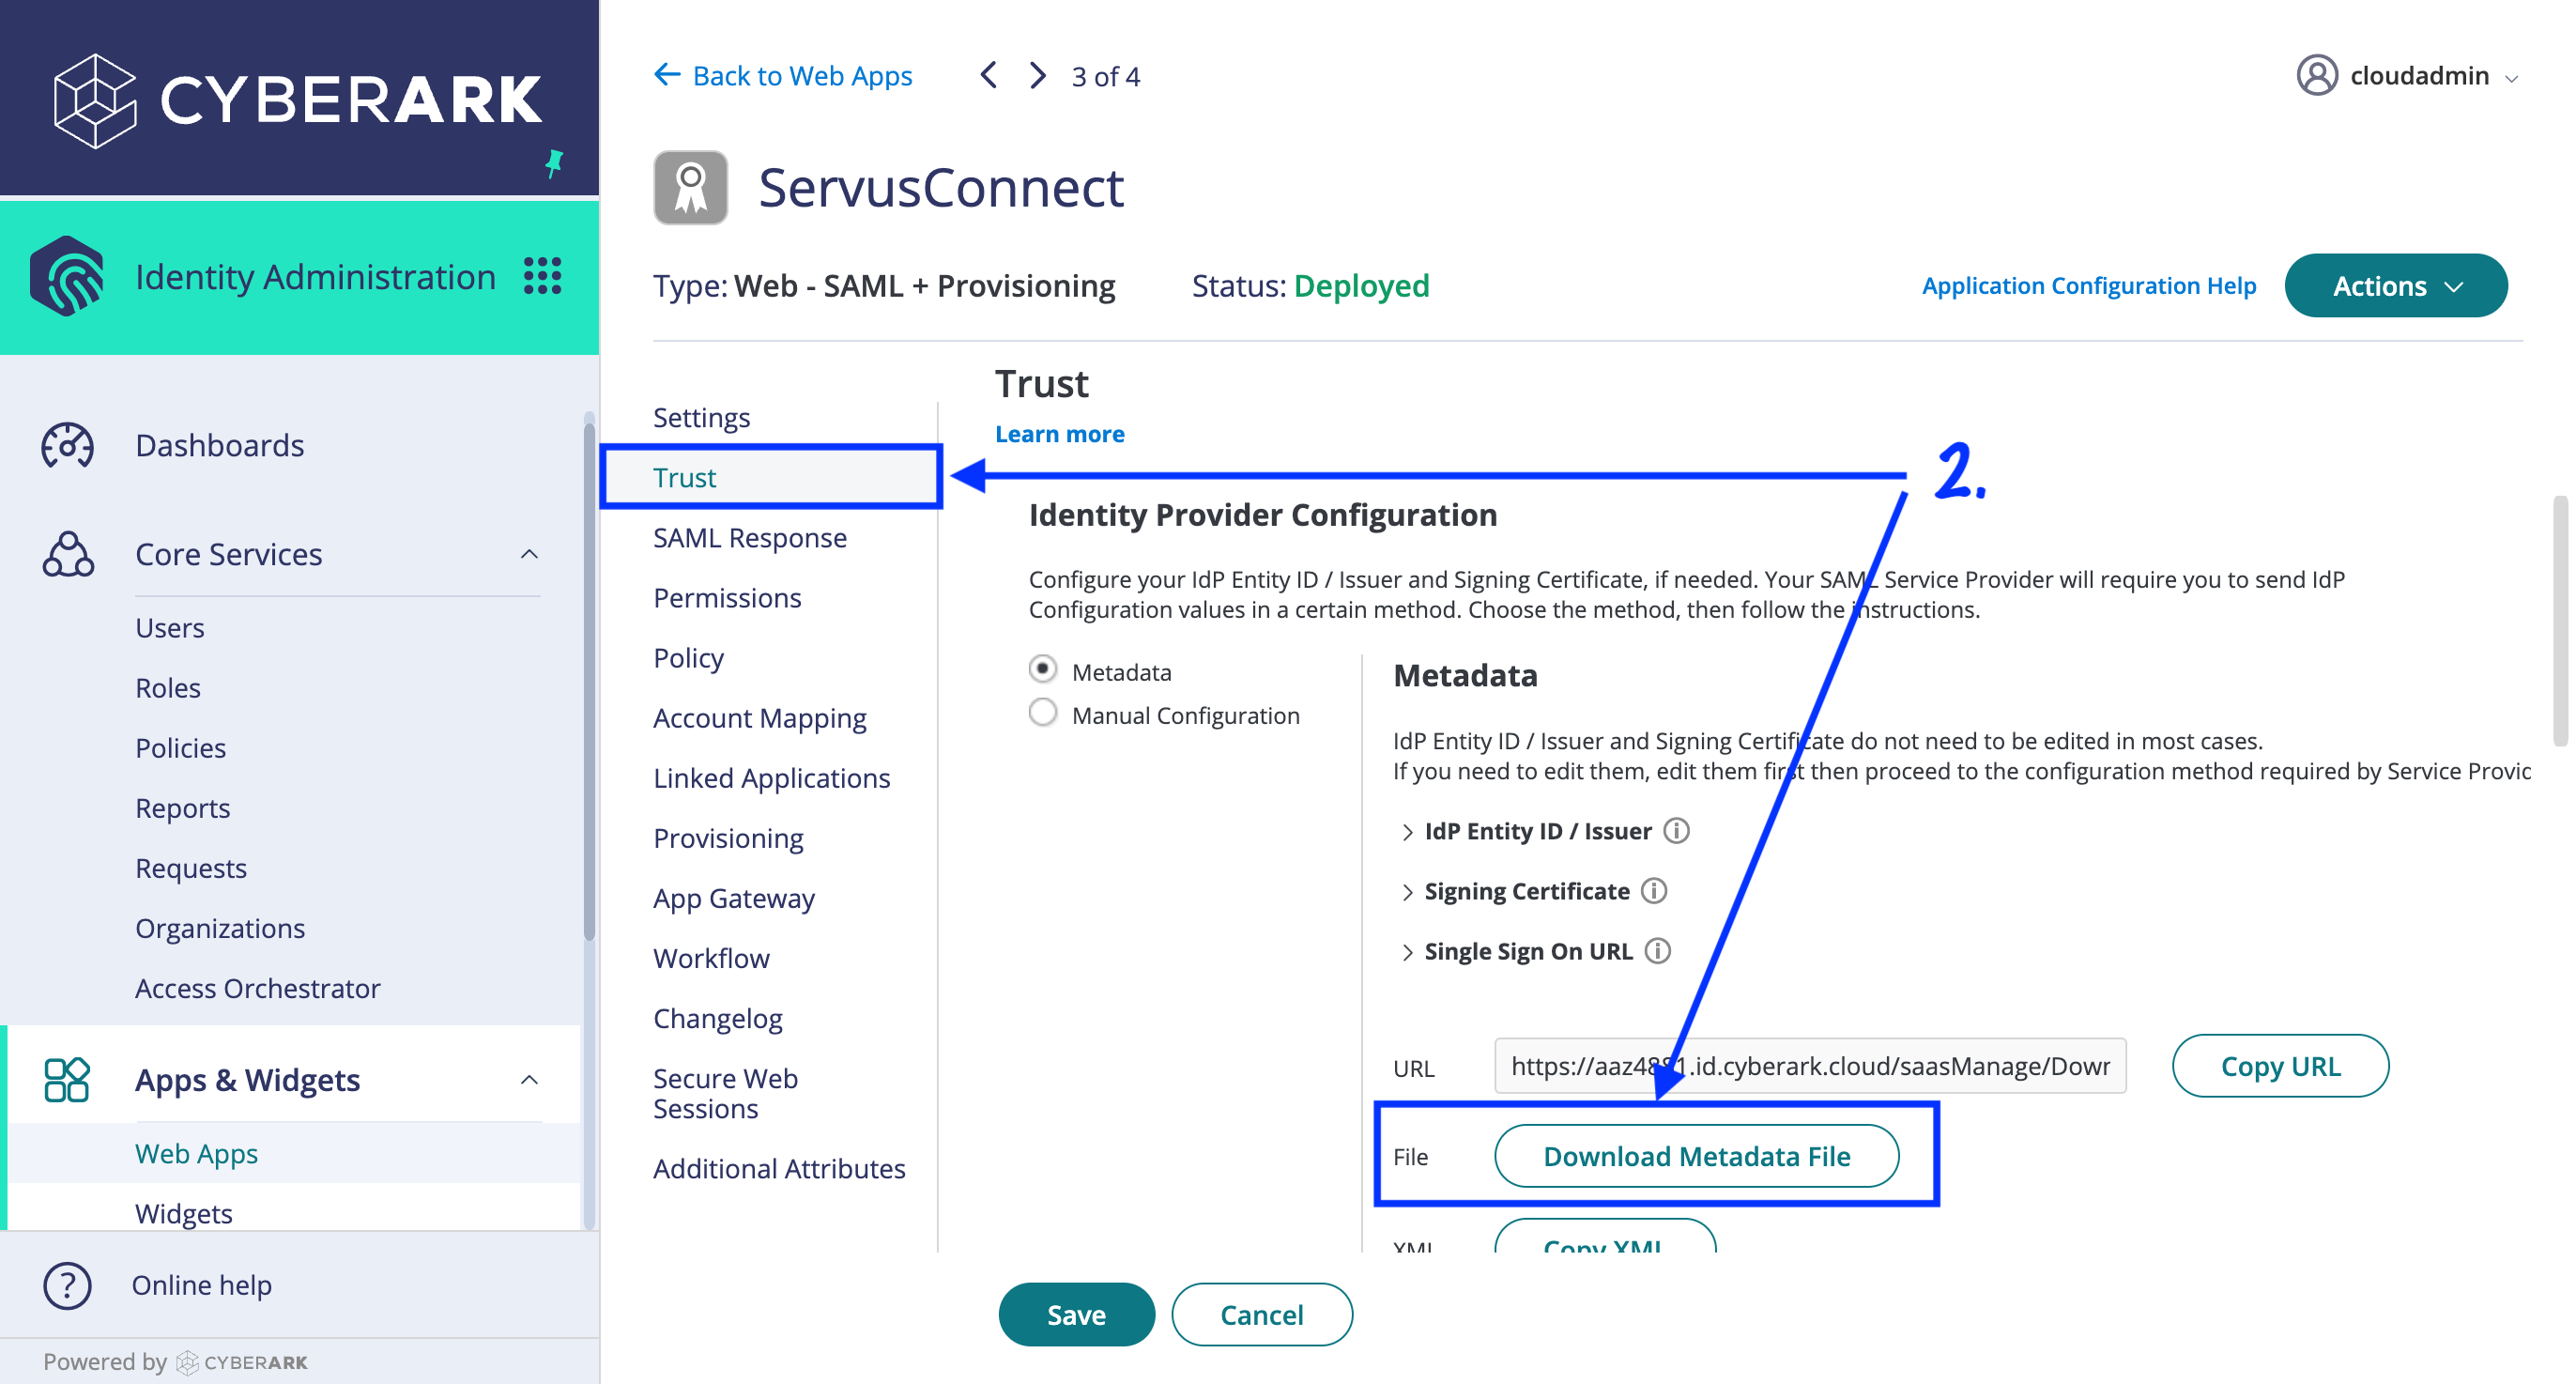
- On the "Trust" tab, don't make any changes in the "Identity Provider Configuration" section, but click on the "Download Metadata File" button. Save this file in a safe place - you'll need to provide it to the NVM Support Team in a later step.
- Futher down the "Trust" tab, within the "Service Provider Configuration" section, enter the following values after choosing the "Manual Configuration" button:
-
SP Entity ID / Issuer / Audience:
urn:amazon:cognito:sp:us-east-1_rlgU6e3y5 -
Assertion Consumer Service (ACS) URL:
https://login.servusconnect.com/saml2/idpresponse
-
- On the "SAML Response" tab, enter the attribute mappings from the table below.
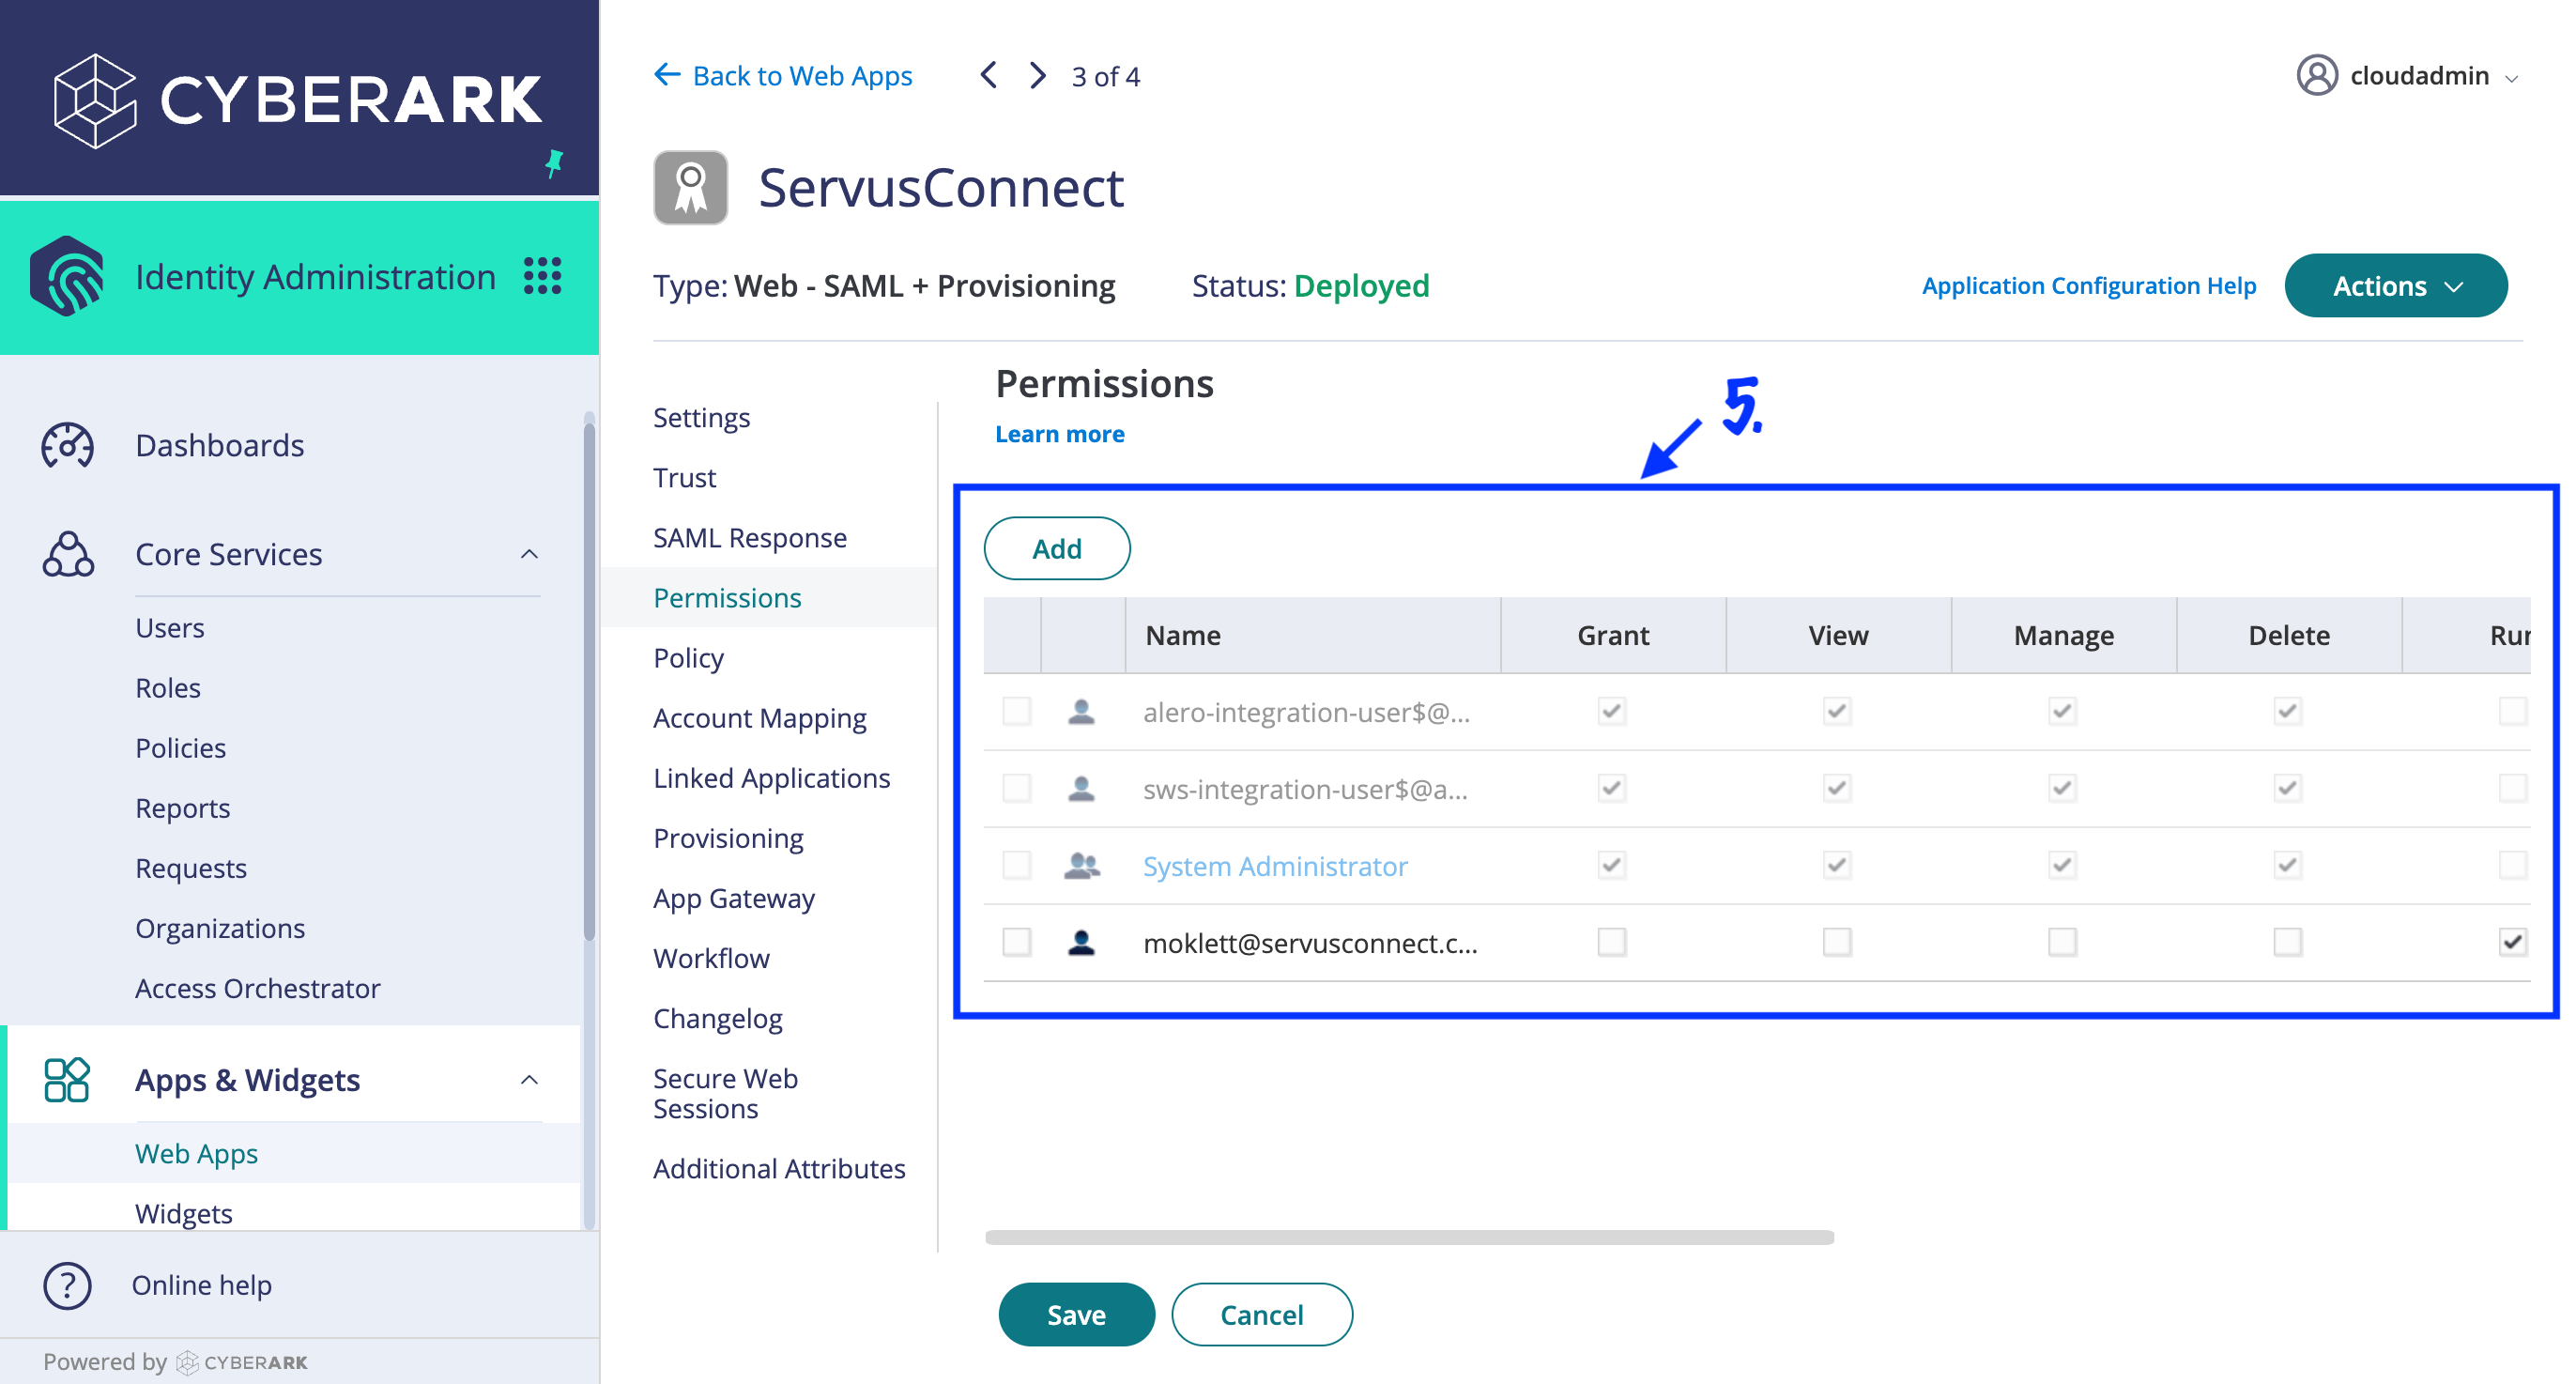
- Finally, on the "Permissions" tab, assign the users or groups you wish to access NetVendor Maintenance via SSO. Your users or groups will need "Run" and "Automatically Deploy" permissions. Only those users you add here will be able to successfully complete authentication. So, during a testing phase, you may assign only certain users, and later you may assign all of your maintenance team users.
Attribute Mappings Table
| Attribute Name | Attribute Value |
| LoginUser.Email | |
| family_name | LoginUser.LastName |
| given_name | LoginUser.FirstName |
| name | LoginUser.DisplayName |


Step 3: Contact our support team to complete the ServusConnect SSO Configuration
- Locate the "Metadata File" you downloaded in an earlier step and saved to your computer.
- Email that file to our support team at support@servusconnect.com.
- Along with the Metadata File, please also share all of the domains that will be used as login emails for your users.
- For example, if you have users who will login as user1@company-example1.com and user2@company-example2.com, we will need to configure both company-example1.com and company-example2.com as login domains for your company.
- If you only have one login domain, it is sufficient to share that single domain with us.
- When NetVendor Support Team has completed the setup, we will email you confirmation that configuration is complete.
Step 4: Login to NetVendor Maintenance
Once configuration is complete on both sides, users who have been granted permission may login to ServusConnect, either from NetVendor Maintenance or from the CyberArk "Applications" tab.
Logging in from NetVendor Maintenance
- Visit https://app.servusconnect.com
- Enter your corporate email in the Email field
- As long as the email domain matches one that was provided to NetVendor Maintenance in Step 3, the user will be presented with a "Login with Microsoft" or "Login with CyberArk" button
- Click the "Login with Microsoft" button to be directed to sign-in
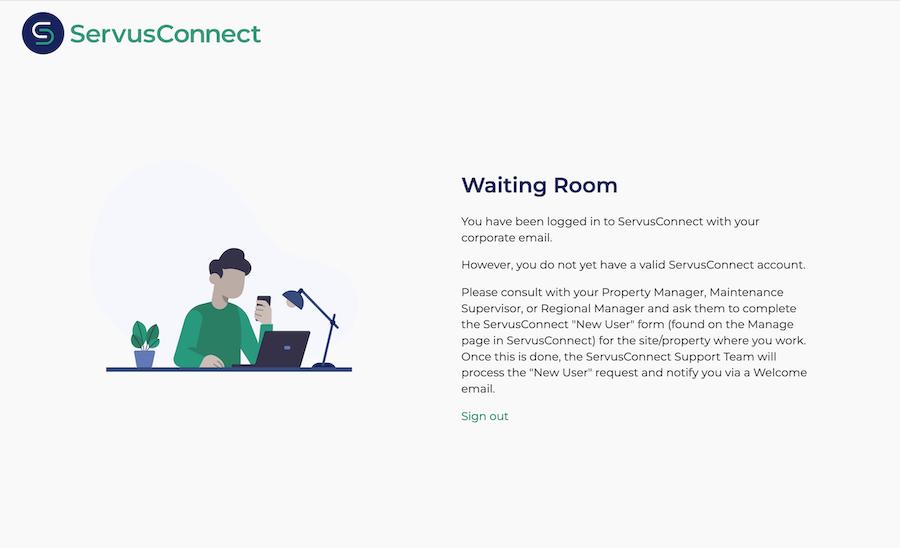
- If there is an existing NetVendor Maintenance user matching the SSO authentication, you will be immediately logged in. Otherwise, you will enter the Waiting Room as pictured below.


Logging In From CyberArk
If you create a "Bookmark" Web App in the CyberArk admin panel, your users will be able to log in from their "Applications" tab. The creation of a Bookmark is required because NetVendor Maintenance does not support IdP-initiated SAML SSO.
- Navigate to Apps & Widgets > Web Apps in the sidebar navigation.
- Click "Add Web Apps".
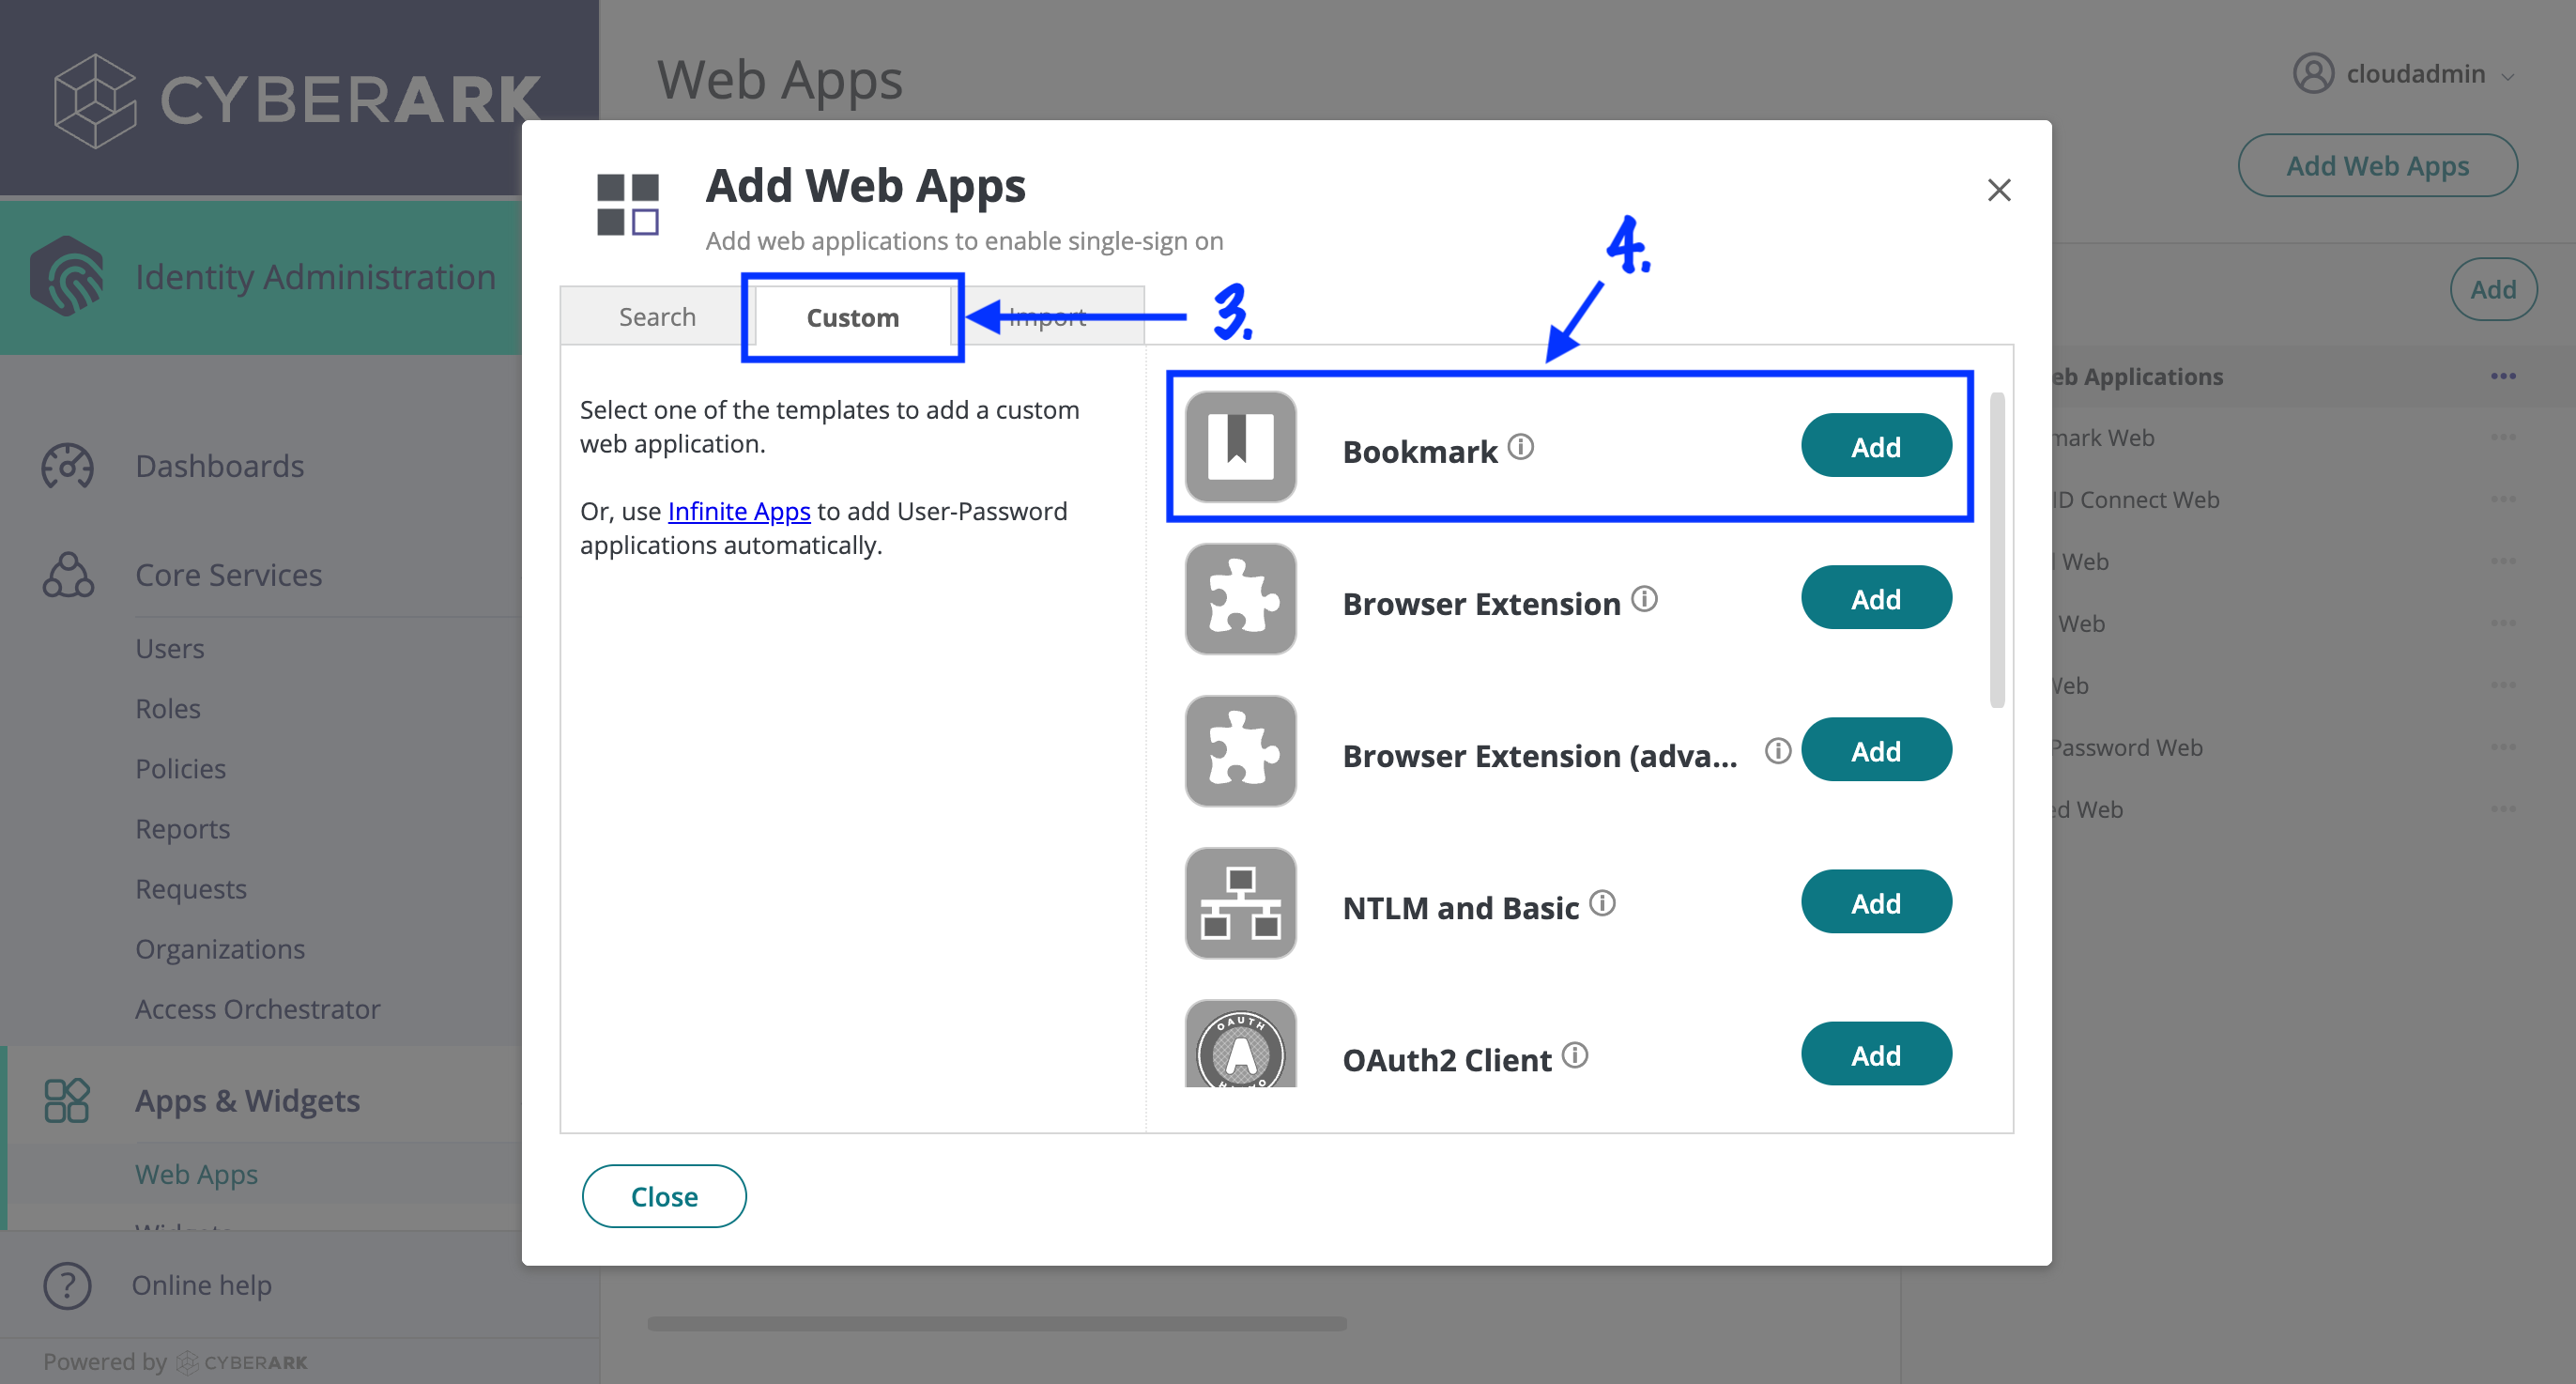
- Choose the "Custom" tab.
- Click "Add" on the "Bookmark" template.
- Confirm that you want to add this application by clicking "Yes".
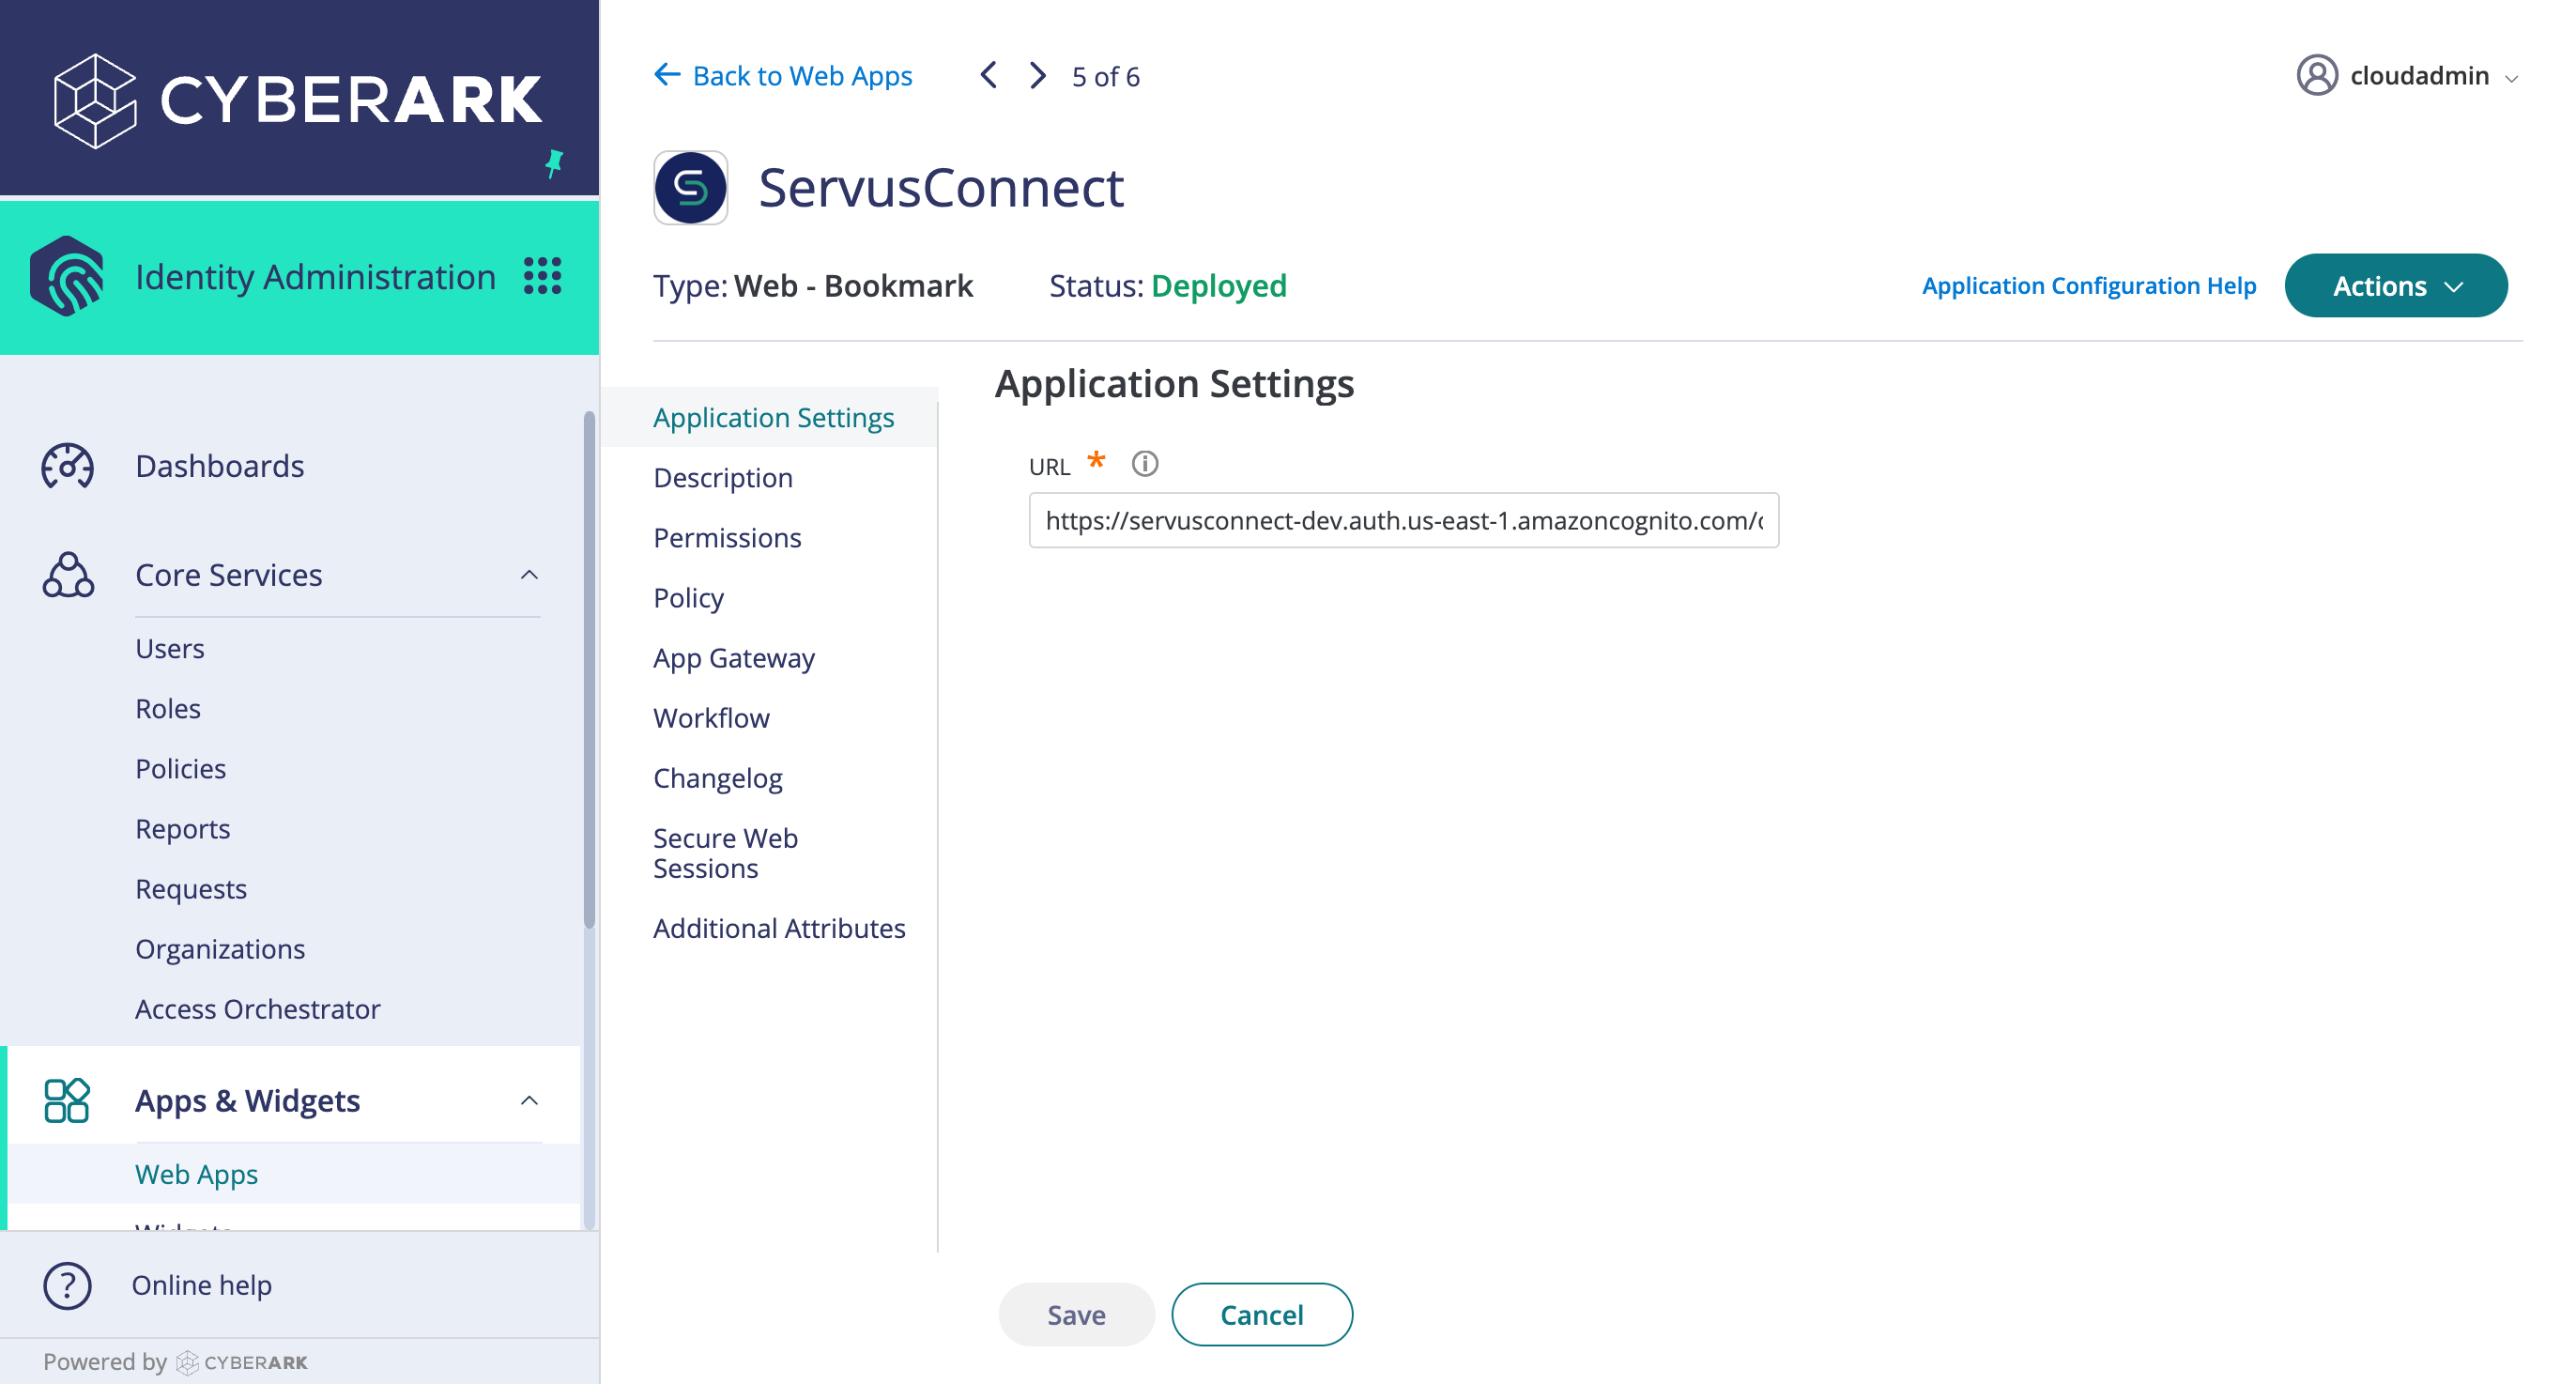
- Configure the Bookmark:
- On the "Application Settings" tab, set the "URL" to the value below, replacing "[client_id]" with the value provided by the NetVendor Maintenance Support Team and "[login_domain]" with the login domain of your emails, provided to us in Step 3:
https://login.servusconnect.com/oauth2/authorize?client_id=[client_id]&idp_identifier=[login_domain]&response_type=code&scope=openid&redirect_uri=https%3A%2F%2Fapp.servusconnect.com%2Fauth%2Fcognito
- On the "Description" tab, fill in the following values:
- Application Name: NetVendor
- Application Description: Your choice - our suggestion is "Login to the NetVendor Maintenance"
- Category: Your choice
- Logo: Download logo here
- On the "Permissions" tab, you must add the same set of users or groups you configured earlier in Step 2. Only those users or groups added to the Bookmark will see the Bookmark, while only those users or groups added to the SAML application will be able to successfully complete the SSO flow.

-png.png)
-png.png)
